Model and manage your data with OpenRegister
Build a complete Pet Store data model in OpenRegister without writing a line of code. You create a register, design a pet schema with typed and validated properties, add owner and category schemas with real relations between them, fill the register with objects through the interface, attach a photo to a pet, make pets findable in Nextcloud's unified search, watch OpenRegister version and audit every change, lock the data down with group permissions, and finally export the whole configuration so it travels between instances. Every step is done live in the app, with API and PHP equivalents alongside.
OpenRegister is the data engine behind every Conduction app. It stores your data not as rows in a hand-built table but as objects that follow a schema you design, grouped into a register you own. Where a traditional application bakes its data model into code and a database migration, OpenRegister lets you draw the model in the interface and start storing real records the same minute, with versioning, an audit trail, search, files and permissions all handled for you.
This tutorial builds a Pet Store data model, the canonical Conduction sample domain. You will create a register, design a pet schema, add owner and category schemas with real relations between them, fill the register with pets through the interface, attach a photo to one, make pets findable in Nextcloud's search, and finally export the whole thing as a configuration file that travels to any other instance. No code, no database, no deploy.
You are at the start of a full data pipeline, all in the Pet Store domain:
- OpenRegister (you are here) — model your data and store it.
- Pull external data in with OpenConnector — feed the register from an external API on a schedule.
- Publish a public catalog with OpenCatalogi — expose the register as an open, harvestable catalog.
Each tutorial stands on its own, but together they take a record from "modelled" to "public".
Several steps below have three tabs — UI, API, and PHP — so you can follow the click-path, automate it with curl, or call OpenRegister's OCA\ services in code. The UI is the star; the API and PHP tabs show the same action as automation.
The three things OpenRegister stores
Before clicking, hold these three words in your head. Everything in OpenRegister is one of them:
- A register is a container. It owns a set of schemas and all the objects that belong to them. "Pet Store" is a register.
- A schema is the shape of one kind of thing. It lists the properties an object has, their types, what is required, and how they validate.
petis a schema. - An object is one real record that follows a schema: Rex the dog, Bella the beagle. Objects live in a register, under a schema.
You build them top-down: register first, then schemas, then objects. That is exactly the order of this tutorial.
Step 1: Create a register
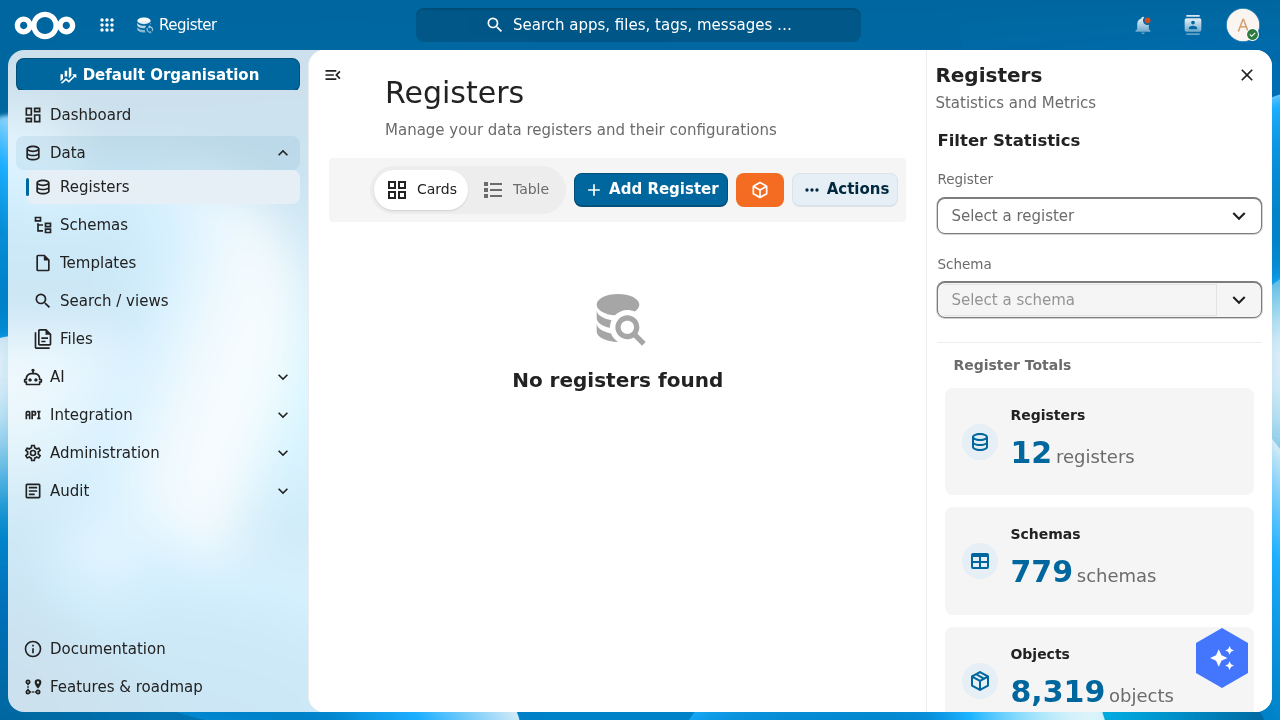
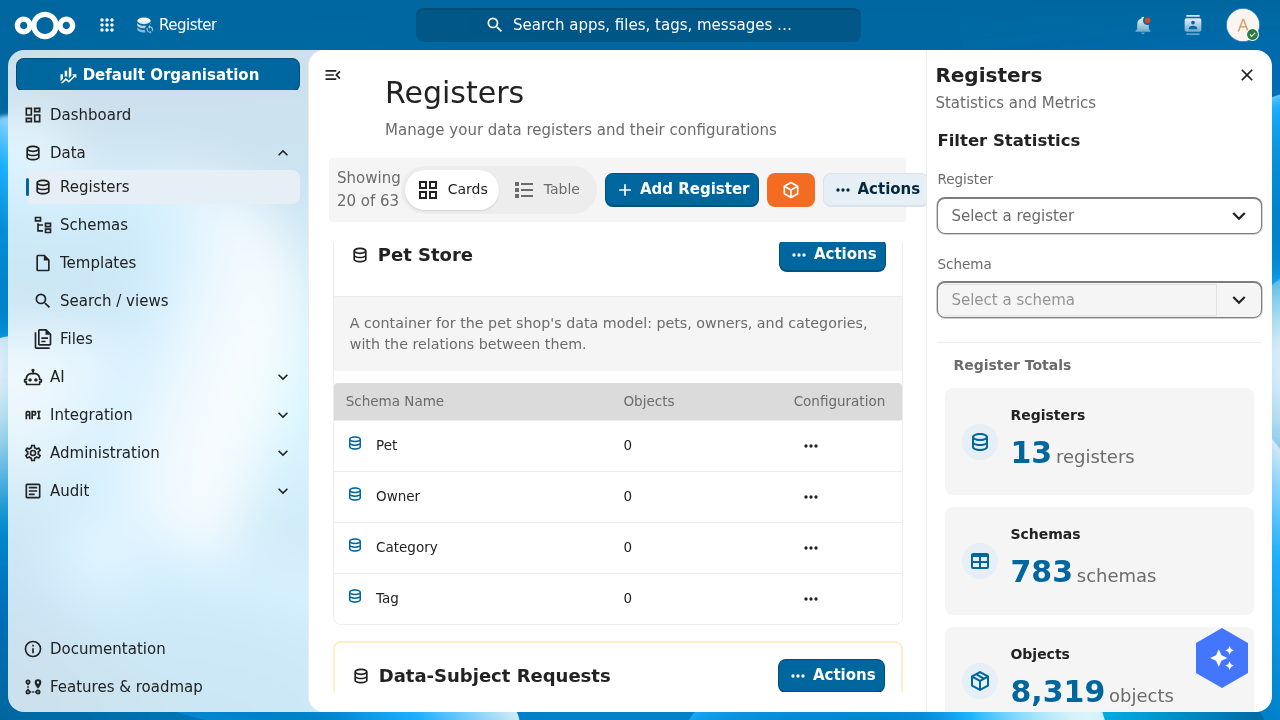
Open OpenRegister from the Nextcloud app menu. In the left navigation open Data → Registers. This is the list of every register on the instance; yours will be empty (or full of other apps' registers). The toolbar carries an Add Register button.
- UI
- API
- PHP
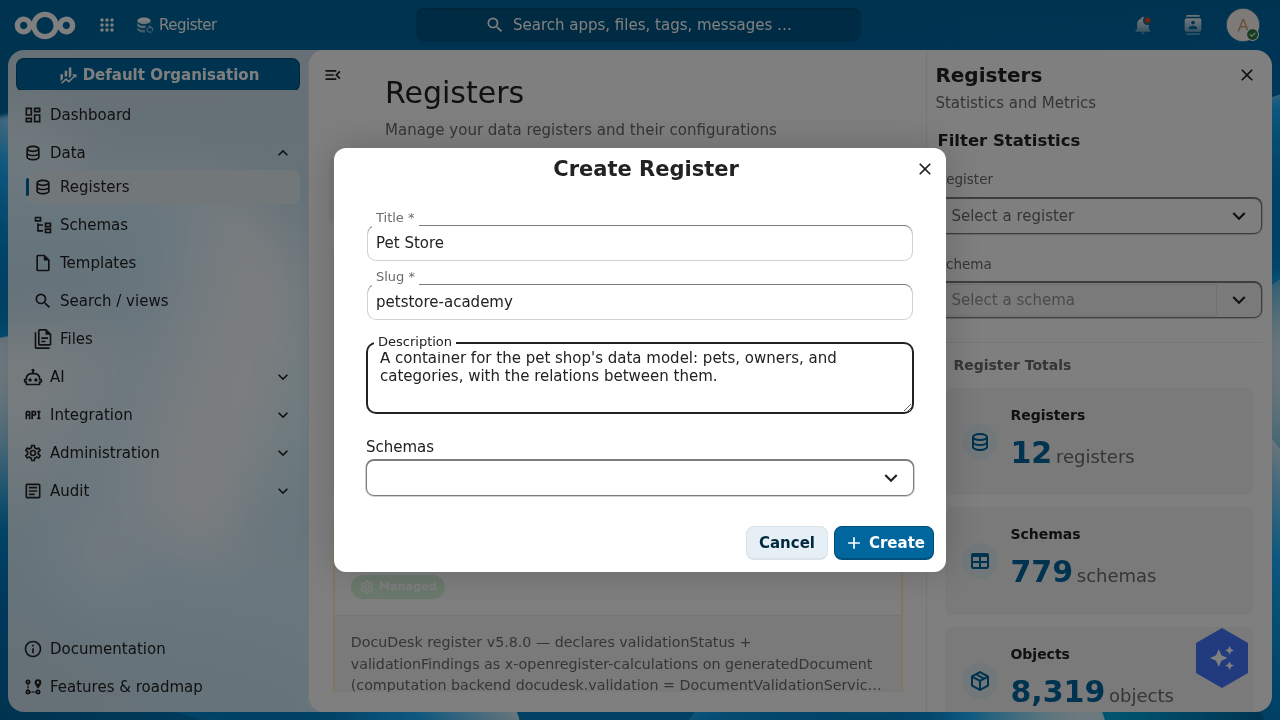
Click Add Register. A dialog asks for a Title, a Slug, and an optional Description. Name it Pet Store, give it the slug petstore-academy (a slug is the stable, lower-cased handle OpenRegister uses to resolve the register; pick a free one — plain petstore may already be taken on a shared instance), and add a short description. Leave the Schemas selector empty; you will add schemas in the next step. Click Create.
Host http://localhost:8080, basic auth admin:admin, and the header OCS-APIRequest: true on every call. Create the register:
curl -u admin:admin -X POST \
  "http://localhost:8080/index.php/apps/openregister/api/registers" \
  -H "OCS-APIRequest: true" -H "Content-Type: application/json" \
  -d '{
        "title": "Pet Store",
        "slug": "petstore-academy",
        "description": "A container for the pet shop'\''s data model."
      }'
The response includes the register's numeric id and its slug. Keep both; you reference the register by either one from here on.
Registers, schemas and objects are all managed through OpenRegister's services. For registers there is a RegisterMapper; for objects (Step 4) there is the ObjectService:
use OCA\OpenRegister\Service\ObjectService;
use OCA\OpenRegister\Db\RegisterMapper;

$registers = \OCP\Server::get(RegisterMapper::class);

$register = $registers->createFromArray([
    'title'       => 'Pet Store',
    'slug'        => 'petstore-academy',
    'description' => 'A container for the pet shop\'s data model.',
]);
Your register opens on its detail page: a statistics panel that reads zero objects, zero schemas, zero files. That zero is the point; you are about to fill it.
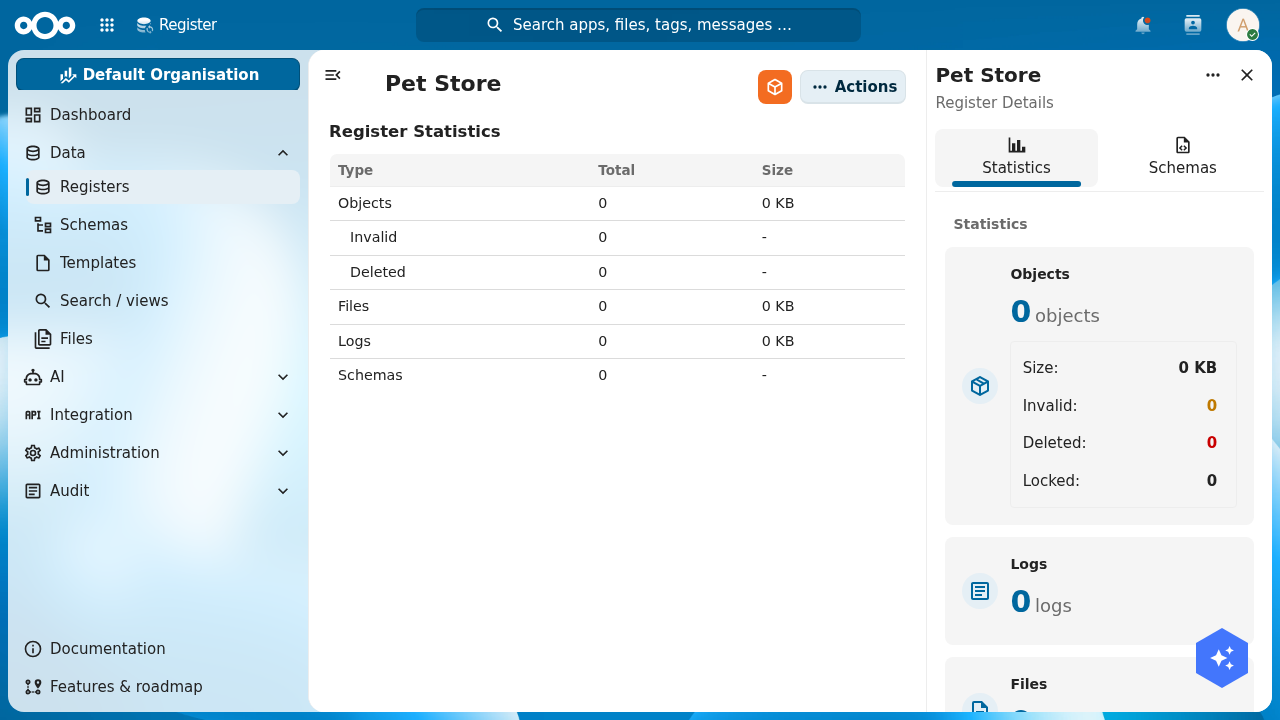
Verify: Pet Store appears in Data → Registers, and opening it shows a statistics panel with zero of everything. Note the slug and id it was given — you will need them for the connector tutorial.
Step 2: Design your first schema, pet
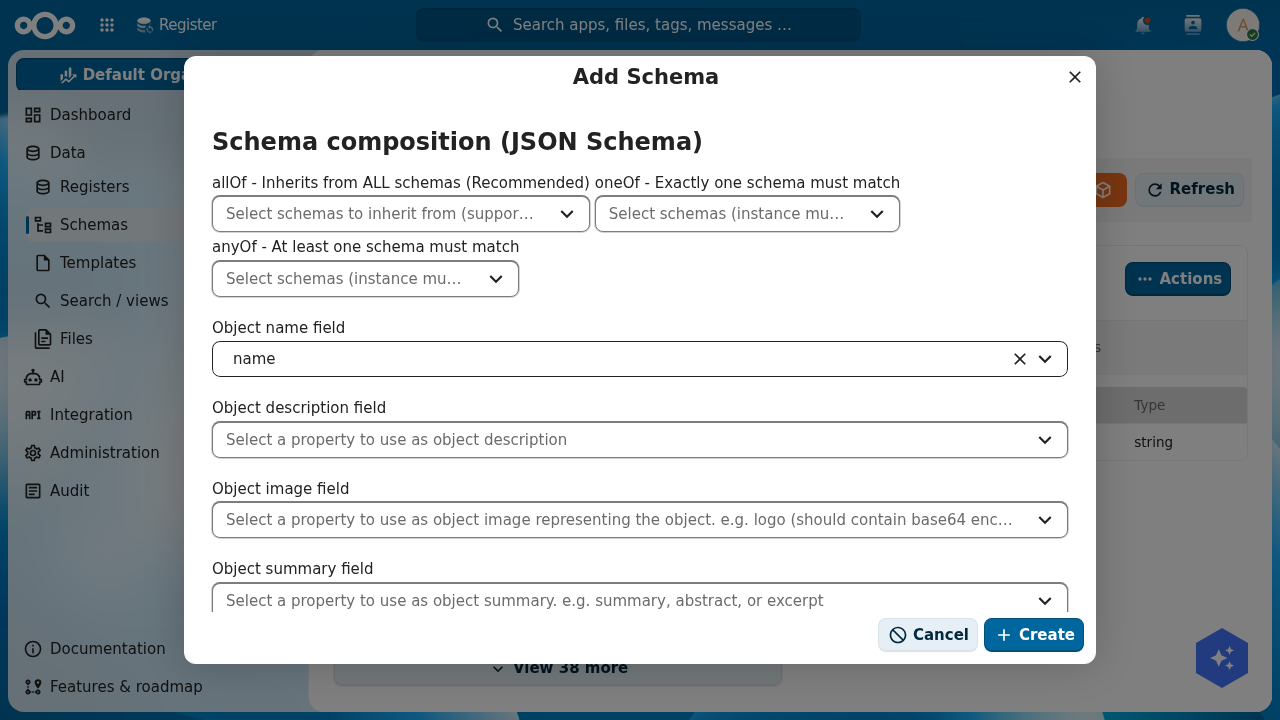
A register is an empty container until it has a schema. Open Data → Schemas and click Add Schema. The schema editor opens with a Title field and three tabs: Properties, Configuration and Security. Title it Pet.
- UI
- API
- PHP
On the Properties tab, click Add property for each field. Each row takes a name and a type from a dropdown: string, number, integer, boolean, array, object, and a few more. Add these:
| Property | Type | Notes |
|---|---|---|
name | string | mark it required |
species | string | |
status | string | available, sold, pending |
dateOfBirth | string | with the date format (below) |
weightKg | number | a decimal |
neutered | boolean | a true/false flag |
price | number | a decimal |

… button on each row opens its full settings.A schema is a JSON Schema. Each property declares its type; the required array names the mandatory ones. Create the pet schema:
curl -u admin:admin -X POST \
  "http://localhost:8080/index.php/apps/openregister/api/schemas" \
  -H "OCS-APIRequest: true" -H "Content-Type: application/json" \
  -d '{
        "title": "Pet",
        "slug": "pet-academy",
        "required": ["name"],
        "properties": {
          "name":        { "type": "string" },
          "species":     { "type": "string" },
          "status":      { "type": "string" },
          "dateOfBirth": { "type": "string", "format": "date" },
          "weightKg":    { "type": "number" },
          "neutered":    { "type": "boolean" },
          "price":       { "type": "number" }
        },
        "searchable": true
      }'
use OCA\OpenRegister\Db\SchemaMapper;

$schemas = \OCP\Server::get(SchemaMapper::class);

$pet = $schemas->createFromArray([
    'title'      => 'Pet',
    'slug'       => 'pet-academy',
    'required'   => ['name'],
    'properties' => [
        'name'        => ['type' => 'string'],
        'species'     => ['type' => 'string'],
        'status'      => ['type' => 'string'],
        'dateOfBirth' => ['type' => 'string', 'format' => 'date'],
        'weightKg'    => ['type' => 'number'],
        'neutered'    => ['type' => 'boolean'],
        'price'       => ['type' => 'number'],
    ],
    'searchable' => true,
]);
Required, formats and validation: the property settings menu
A type is the start. The … actions menu on a property row is where the field really gets defined. It is one menu with every setting in it: toggles for Required, Immutable, Deprecated, Visible to end users and Facetable; a Format dropdown; Title, Description, Example and Order; value constraints (a fixed Constant, an enum of allowed values); a Default value; and string limits (minimum/maximum length, a pattern regex).
Open the menu on dateOfBirth and set its Format to Date. A date is stored as a string, but the date format tells OpenRegister (and every app that reads it) to treat it as a calendar date: the list view renders "March 2022" instead of a raw string, and the editor can offer a date picker. The format list is long and practical — email, uuid, url, color-hex, even Dutch government formats like bsn and kvk — so you rarely need a custom pattern.
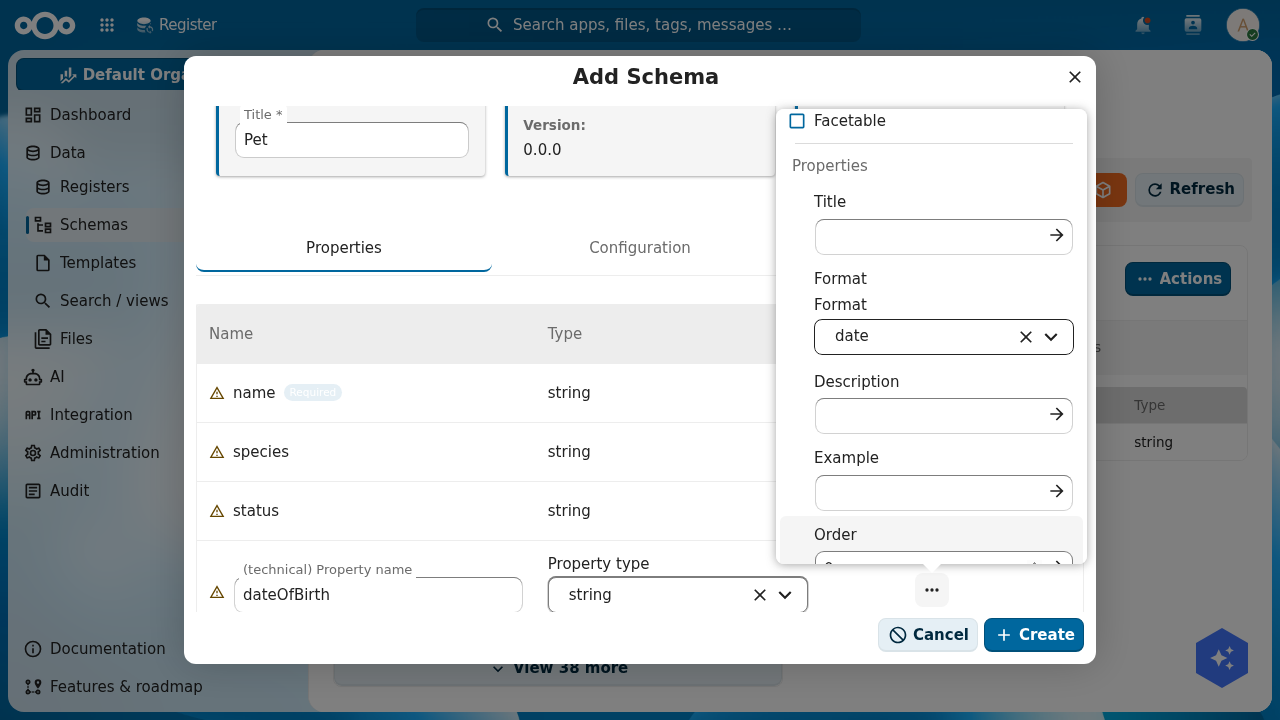
… on a row). Here dateOfBirth's Format is set to date. The same menu holds Required, enums, defaults, length limits and per-property permissions.The Configuration tab: identity and behaviour
The Configuration tab sets how the whole schema behaves. Give it a Slug (pet-academy). Pick the Object name field (name) so OpenRegister knows which property to show as an object's label in lists and search. Below that sit the schema composition controls (allOf / oneOf / anyOf, for inheriting from or combining other schemas), an Allow files toggle (needed for Step 5), and the Searchable flag you will use in Step 6.
Click Create. The pet schema is saved.
Verify: the Pet schema appears in Data → Schemas, listing name (required), species, status, dateOfBirth, weightKg, neutered and price with their types.
Step 3: Add related schemas and relations
A pet has an owner and belongs to a category. Those are things in their own right, so they get their own schemas. Add three more the same way you added pet:
owner—firstName,lastName(required),email(format email),phone,city.category—name(required),description,icon.tag—name(required),color(format color-hex).
Then add the relations on pet. A relation is a property that points at another object instead of holding a plain value. In OpenRegister a relation is a string property with format uuid carrying an x-openregister-relation marker that names the target schema and the cardinality. A to-many relation (one pet, many tags) is an array of UUIDs with the same marker.
Add three relation properties to pet:
| Property | Points at | Cardinality |
|---|---|---|
owner | owner | one |
category | category | one |
tags | tag | many |
- UI
- API
- PHP
Create the owner, category and tag schemas exactly as you created pet (Step 2): Add Schema, title it, add its properties, save. Then attach all four schemas to the register: open Data → Registers, open the Pet Store register's Actions → View Details, switch the right sidebar to the Schemas tab, and you will see the register's schemas listed there with an Edit Schema button on each.
For the relations, open the pet schema and add a property for owner, category and tags. Give each the uuid format from the property settings menu; OpenRegister resolves a UUID in one of these fields to the real object it names. (The visual relation builder in OpenBuild writes the full x-openregister-relation marker for you; in OpenRegister's own editor you set the format and link by UUID, which the API tab shows in full.)
Create the three related schemas:
curl -u admin:admin -X POST "http://localhost:8080/index.php/apps/openregister/api/schemas" \
  -H "OCS-APIRequest: true" -H "Content-Type: application/json" \
  -d '{ "title": "Owner", "slug": "owner-academy", "required": ["lastName"],
        "properties": { "firstName": {"type":"string"}, "lastName": {"type":"string"},
          "email": {"type":"string","format":"email"}, "phone": {"type":"string"},
          "city": {"type":"string"} }, "searchable": true }'

curl -u admin:admin -X POST "http://localhost:8080/index.php/apps/openregister/api/schemas" \
  -H "OCS-APIRequest: true" -H "Content-Type: application/json" \
  -d '{ "title": "Category", "slug": "category-academy", "required": ["name"],
        "properties": { "name": {"type":"string"}, "description": {"type":"string"},
          "icon": {"type":"string"} }, "searchable": true }'

curl -u admin:admin -X POST "http://localhost:8080/index.php/apps/openregister/api/schemas" \
  -H "OCS-APIRequest: true" -H "Content-Type: application/json" \
  -d '{ "title": "Tag", "slug": "tag-academy", "required": ["name"],
        "properties": { "name": {"type":"string"},
          "color": {"type":"string","format":"color-hex"} } }'
Now add the relation properties to pet (a PUT replaces the schema's properties). This is the exact relation marker:
curl -u admin:admin -X PUT \
  "http://localhost:8080/index.php/apps/openregister/api/schemas/<PET_SCHEMA_ID>" \
  -H "OCS-APIRequest: true" -H "Content-Type: application/json" \
  -d '{ "title": "Pet", "slug": "pet-academy", "required": ["name"],
        "properties": {
          "name": {"type":"string"}, "species": {"type":"string"},
          "status": {"type":"string"}, "dateOfBirth": {"type":"string","format":"date"},
          "weightKg": {"type":"number"}, "neutered": {"type":"boolean"},
          "price": {"type":"number"},
          "owner":    {"type":"string","format":"uuid",
                       "x-openregister-relation": {"target":"owner-academy","cardinality":"one"}},
          "category": {"type":"string","format":"uuid",
                       "x-openregister-relation": {"target":"category-academy","cardinality":"one"}},
          "tags":     {"type":"array","items":{"type":"string","format":"uuid"},
                       "x-openregister-relation": {"target":"tag-academy","cardinality":"many"}}
        }, "searchable": true }'
Finally, point the register at all four schemas:
curl -u admin:admin -X PUT \
  "http://localhost:8080/index.php/apps/openregister/api/registers/<REGISTER_ID>" \
  -H "OCS-APIRequest: true" -H "Content-Type: application/json" \
  -d '{ "title": "Pet Store", "slug": "petstore-academy",
        "schemas": [<PET_ID>, <OWNER_ID>, <CATEGORY_ID>, <TAG_ID>] }'
// owner, category and tag are created with $schemas->createFromArray(...) as in Step 2.

// Add relations to the pet schema. A relation = string + uuid + the marker.
$pet->setProperties(array_merge($pet->getProperties(), [
    'owner' => [
        'type' => 'string', 'format' => 'uuid',
        'x-openregister-relation' => ['target' => 'owner-academy', 'cardinality' => 'one'],
    ],
    'category' => [
        'type' => 'string', 'format' => 'uuid',
        'x-openregister-relation' => ['target' => 'category-academy', 'cardinality' => 'one'],
    ],
    'tags' => [
        'type' => 'array', 'items' => ['type' => 'string', 'format' => 'uuid'],
        'x-openregister-relation' => ['target' => 'tag-academy', 'cardinality' => 'many'],
    ],
]));
$schemas->update($pet);

// Attach every schema to the register.
$register->setSchemas([$pet->getId(), $owner->getId(), $category->getId(), $tag->getId()]);
$registers->update($register);
Verify: open the Pet Store register's detail page and switch the sidebar to the Schemas tab. All four schemas — Pet, Owner, Category, Tag — are listed under the one register.
Pet, Owner, Category, Tag — with the relations between them declared on pet.Step 4: Add objects through the interface
A model with no data is hard to judge. Fill it. The fastest place to browse and add objects is Data → Search / views: in its sidebar, select the Pet Store register and then the Pet schema. The page now scopes to pets, and the toolbar's Add button reads Add Pet.
- UI
- API
- PHP
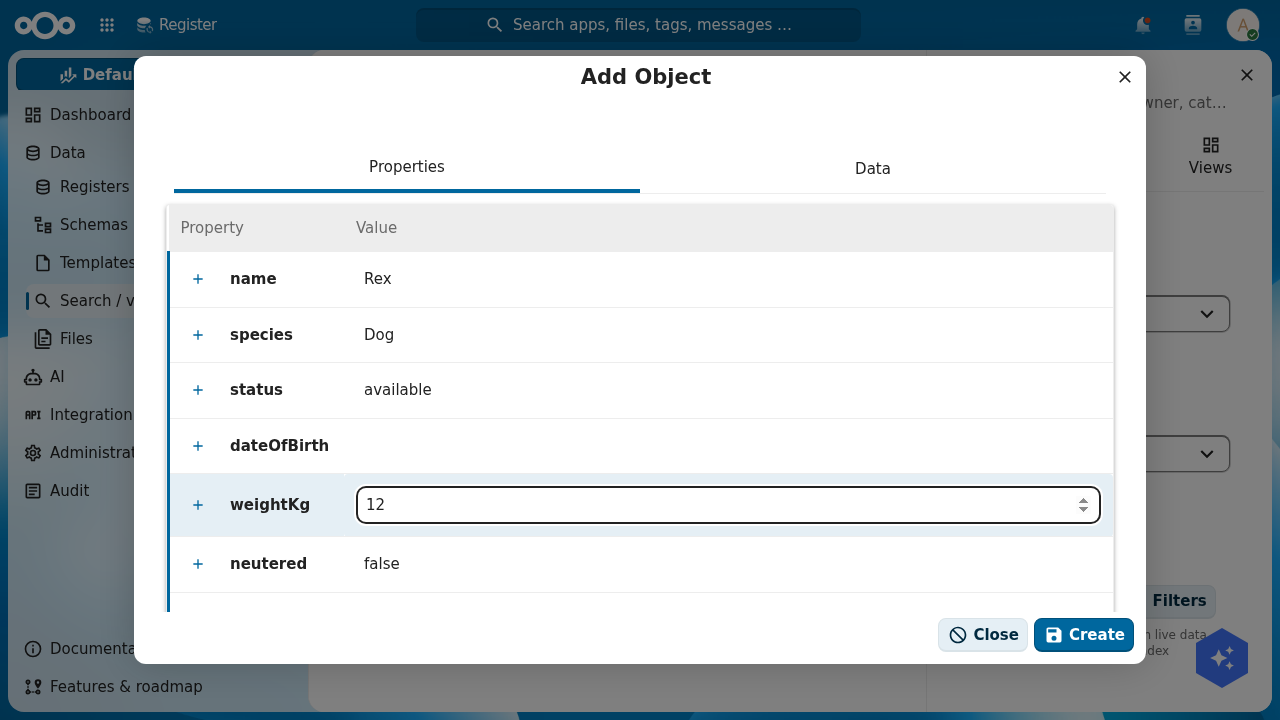
Click Add Pet. The Add Object form lists every property of the schema as an editable row — including the relation rows owner, category and tags. Click a value cell to edit it: type Rex for name, Dog for species, available for status, 12 for weight. Click Create.
Repeat for a handful of pets across the species — a sold beagle, an available parakeet, a pending iguana — and add a couple of owners (open the owner schema and Add Owner) and four categories (Dogs, Cats, Birds, Reptiles). Variety is what makes the list and, later, the dashboards worth looking at. Create roughly six pets, two owners, four categories and five tags.
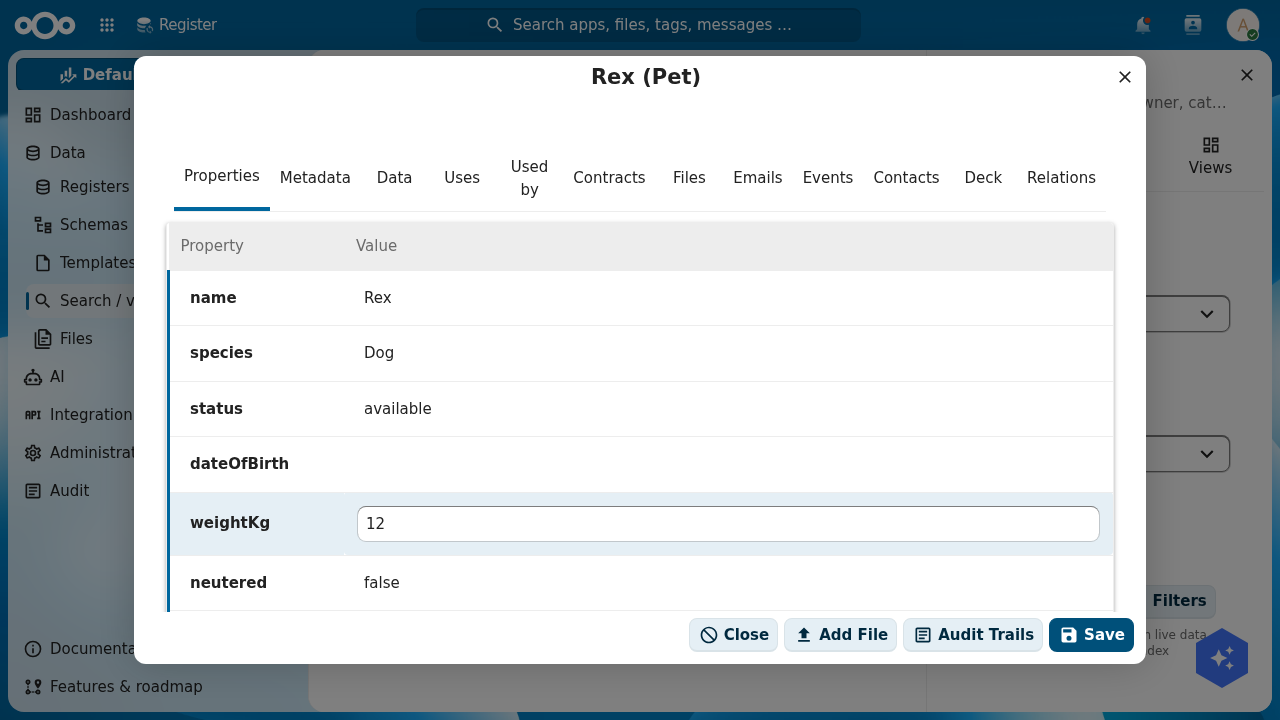
Creating an object opens it on its detail view: a property grid you can edit in place, plus a row of tabs — Uses and Used by (its resolved relations), Files (Step 5), Metadata, Relations, and more — and footer buttons for Add File, Audit Trails and Save.
An object is created against its register and schema (by slug or id). Link it to related objects by their UUIDs:
curl -u admin:admin -X POST \
  "http://localhost:8080/index.php/apps/openregister/api/objects/petstore-academy/pet-academy" \
  -H "OCS-APIRequest: true" -H "Content-Type: application/json" \
  -d '{ "name": "Bella", "species": "Dog", "status": "sold",
        "dateOfBirth": "2022-03-14", "weightKg": 18.4, "neutered": true, "price": 450,
        "owner": "<OWNER_UUID>", "category": "<DOGS_UUID>",
        "tags": ["<FRIENDLY_UUID>", "<VACCINATED_UUID>"] }'
List a schema's objects (the response carries total and a results array):
curl -u admin:admin \
  "http://localhost:8080/index.php/apps/openregister/api/objects/petstore-academy/pet-academy" \
  -H "OCS-APIRequest: true"
This is the one service you reach for most. saveObject creates or updates an object against a register and schema:
use OCA\OpenRegister\Service\ObjectService;

$objects = \OCP\Server::get(ObjectService::class);

$bella = $objects->saveObject(
    object: [
        'name'        => 'Bella',
        'species'     => 'Dog',
        'status'      => 'sold',
        'dateOfBirth' => '2022-03-14',
        'weightKg'    => 18.4,
        'neutered'    => true,
        'price'       => 450,
        'owner'       => $ownerUuid,
        'category'    => $dogsUuid,
        'tags'        => [$friendlyUuid, $vaccinatedUuid],
    ],
    register: 'petstore-academy',
    schema:   'pet-academy',
);

// Read them back.
$pets = $objects->findAll(register: 'petstore-academy', schema: 'pet-academy');
Back on Search / views, your pets fill the table — name, species, status, weight, owner — with the count reading "Showing 6 of 6". This list, its columns and its search box all come from the schema; you configured none of them by hand.
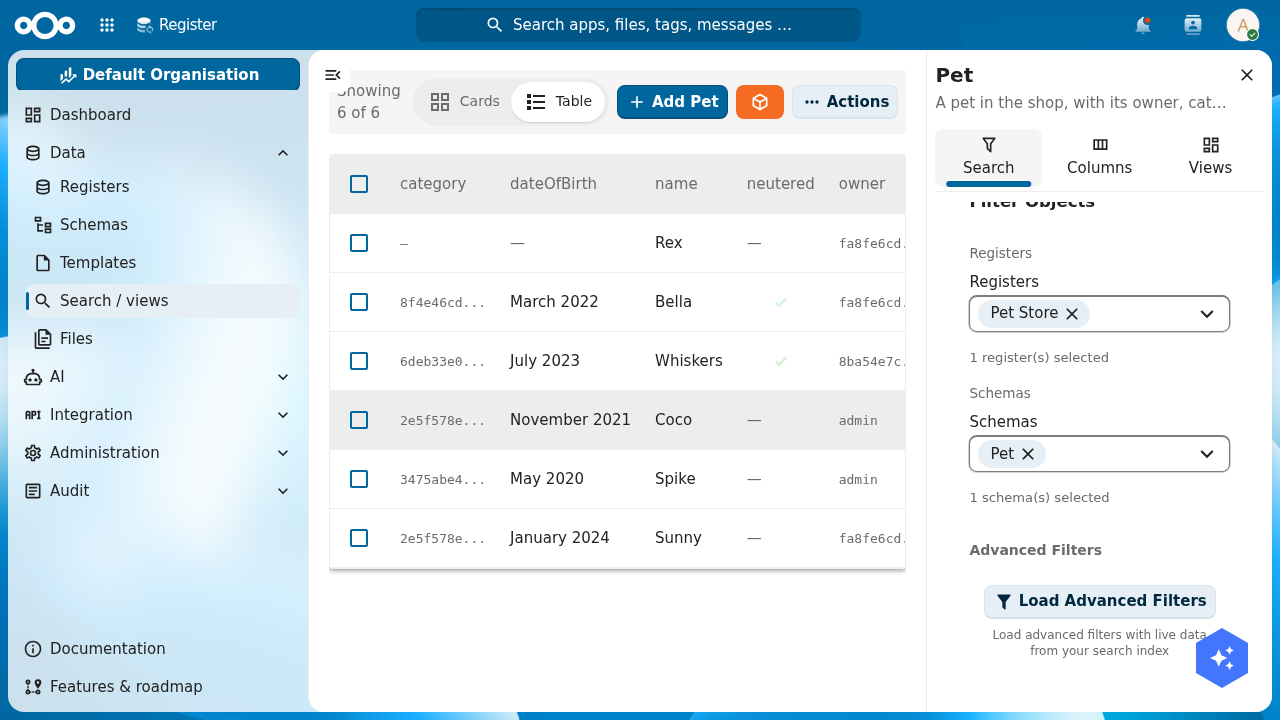
Verify: the object count for pet reads 6, and a pet's detail view shows its values, with its owner and category resolving under the Uses tab.
Step 5: Attach a file to an object
Structured fields belong in properties; documents belong in files. A pet's photo or vaccination certificate is a file you attach to the object. Open a pet's detail view and click Add File. (For this to work the schema's Allow files toggle, on the Configuration tab, must be on.)
The Add Attachment dialog gives you a label selector, an Auto share toggle, and a drop zone with an Add a file or files button. Pick No label, drop or choose an image, and OpenRegister stores it against the object in Nextcloud Files. The dialog confirms "Files added successfully" and lists the attachment.
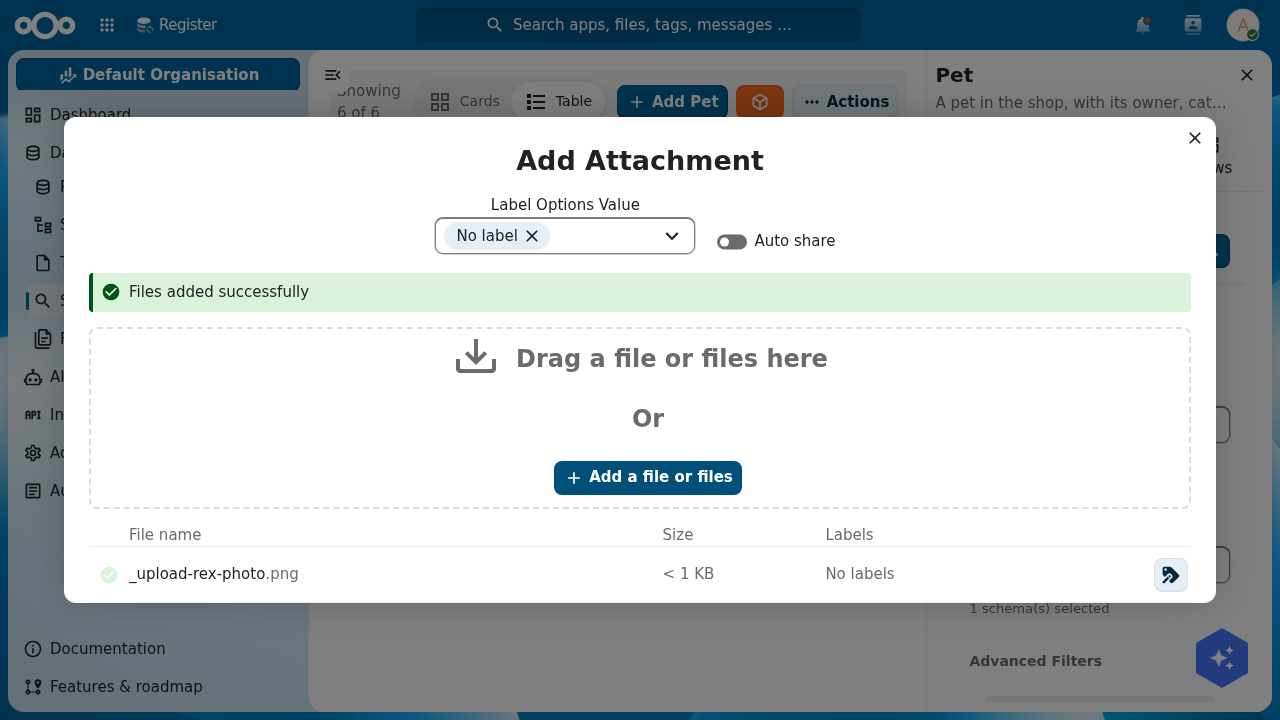
Verify: the file appears in the attachment table on the pet, and under the object's Files tab.
Step 6: Make objects findable
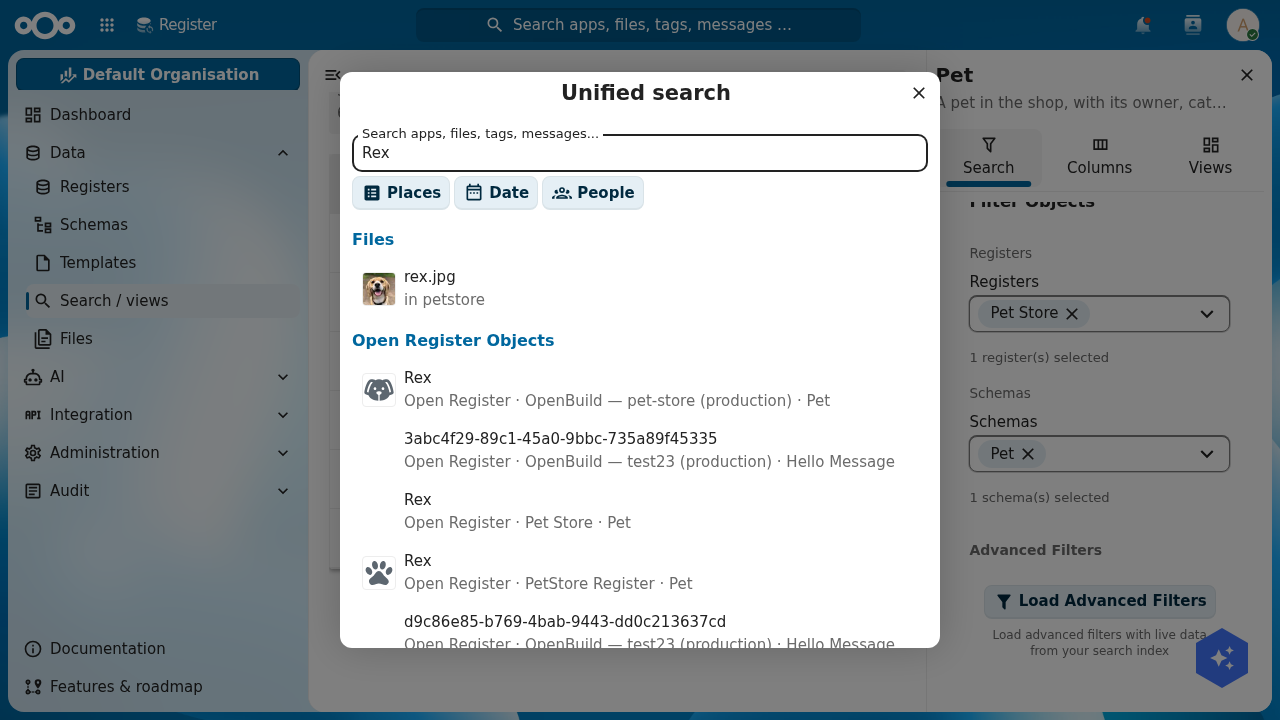
You want a colleague to find Rex from the magnifier at the top of Nextcloud, next to files and messages. Two settings do it, both on the schema's Configuration tab: the Searchable flag (turn it on for pet, owner and category), and optionally an Icon so the result carries a recognisable glyph.
With searchable on, OpenRegister feeds those objects to Nextcloud's unified search through a single fleet-wide provider. There is no search index to build and no search code to write. Open the top-bar search, type a pet's name, and after a moment's indexing it appears under an Open Register Objects heading, labelled with its register and schema.
Troubleshooting
The pet does not show in search straight after you create it. Unified search reads an index that updates asynchronously, so a brand-new object can take a few seconds to appear. Give it a moment and search again. If it never appears, confirm the schema's Searchable flag is on and that you are searching a value in a text property (the name), not a relation UUID.
Verify: searching a pet's name returns it under Open Register Objects, with the result naming your Pet Store register.
Step 7: Versioning and the audit trail
You did not switch anything on for this; OpenRegister versions and logs every object automatically. Every create, read, update and delete is recorded with who did it, when, and how large the object was. Change a pet's price and save: that is a new version, and a new audit entry.
Open the Audit Trails page (from the Audit menu, or the Audit Trails button on an object's detail view). It is a filterable log of every action across your registers — CREATE, READ, UPDATE, DELETE — with the object, register and schema ids, the user, and the timestamp. Filter it by register and schema in the sidebar to see just your Pet Store's history, and Export it when you need an evidence trail.
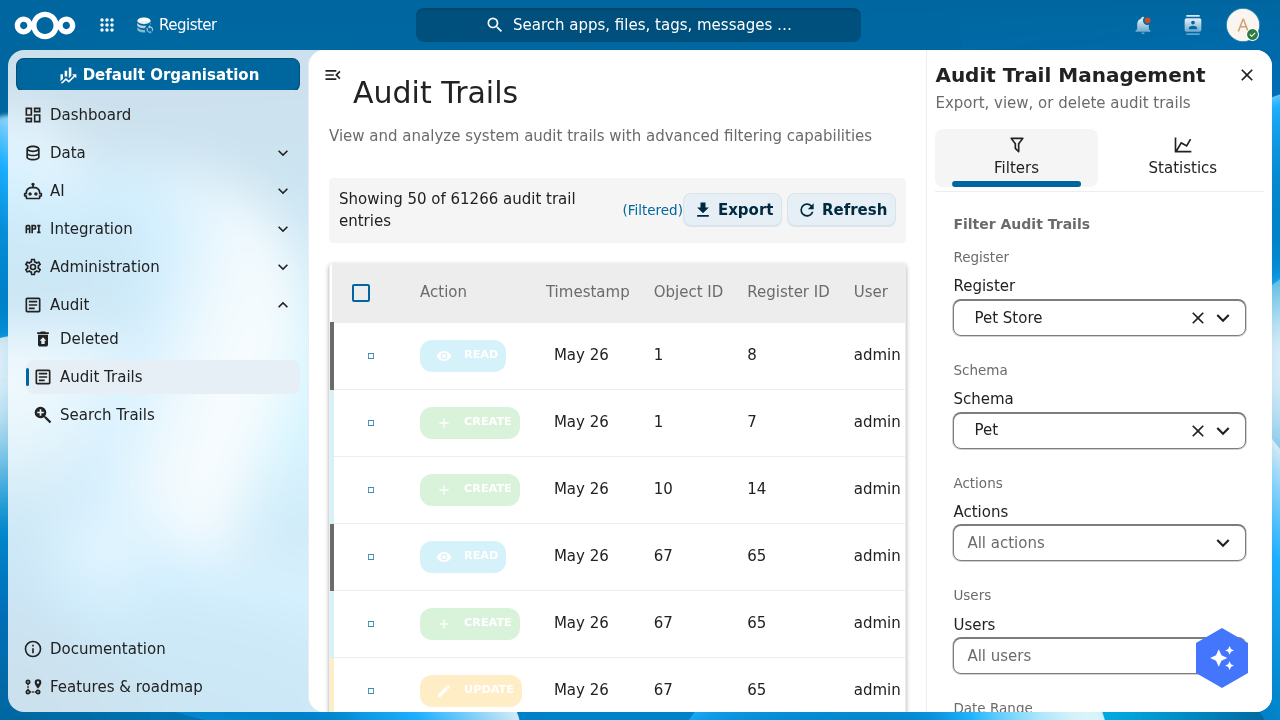
Verify: edit a pet, save, and the Audit Trails log shows an UPDATE entry for that object under your user, on top of the earlier CREATE.
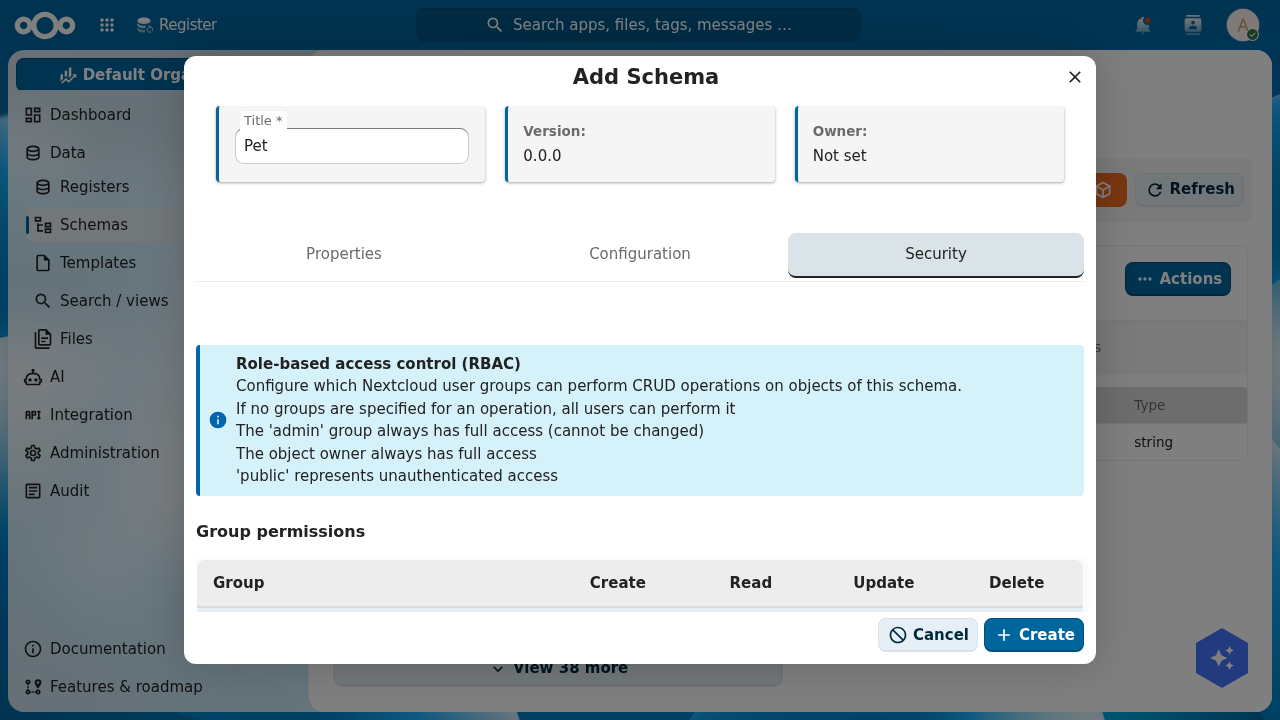
Step 8: Lock the data down with permissions
The store's prices and a customer's contact details are not for everyone. OpenRegister puts access control on the data itself, not on a hidden menu. The schema's Security tab is a role-based access control (RBAC) matrix: per Nextcloud group, you grant Create, Read, Update and Delete.
The rules, spelled out on the tab itself: if no group is named for an operation, every user may perform it; the admin group always has full access and cannot be locked out; the object's owner always has full access; and public represents unauthenticated access. So to make owner records readable only by a staff group, create that group in Nextcloud's user settings, then set the owner schema's Read (and Create/Update/Delete) to staff. A user outside the group now reads no owners — enforced by OpenRegister on every request, whatever app or API they come through.
Verify: put one test user in the group and one outside it, sign in as each, and confirm the outsider reads no objects of the locked schema while the member, the owner, and any admin do.
Step 9: Export and import the register's configuration
Your whole data model — the register, its four schemas, the relations, the permissions — is configuration. It can leave this instance as a file and arrive on another exactly as you built it. That is how a register goes from your laptop to a colleague's, or from a dev instance to production, without rebuilding it by hand.
Open Administration → Configurations. Each configuration card has an Actions menu with Export (and a register's own Actions menu offers Download API Specification), which hands you a JSON file describing the register and its schemas. To bring one in, click Import Configuration. The dialog offers four sources: Discover, GitHub / GitLab, Import from File, and Import from URL — paste a link to a configuration JSON and OpenRegister fetches it, recreating the register, its schemas and any seed objects in one transaction. You can even enable automatic synchronisation so the register tracks the source on a schedule.
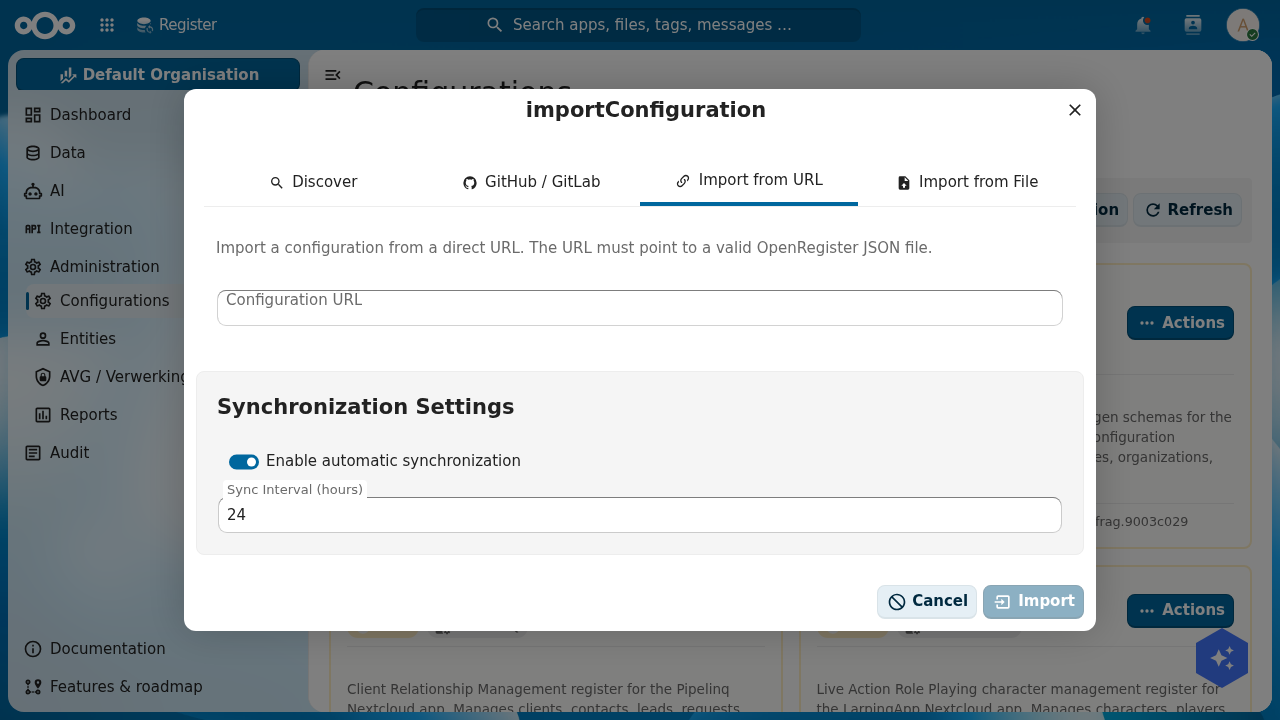
This is exactly how the canonical Conduction registers travel. The Woo register tutorial, for instance, imports a published woo_register.json from a URL and gets ten ready-made schemas in one click. Your Pet Store can be shared the same way.
Verify: export your Pet Store configuration and open the JSON; it lists the register, the four schemas and their properties. Importing that file into a fresh OpenRegister instance recreates the whole model.
Test yourself
You have modelled the data if all of these are true:
- The Pet Store register lists four schemas:
pet,owner,category,tag. - The
petschema hasnamerequired, adateOfBirthwith the date format, andowner,categoryandtagsas relations. - Six pets are browsable in Search / views, and a pet's detail view resolves its owner and category under Uses.
- A file is attached to at least one pet.
- Searching a pet's name in Nextcloud's top bar returns it under Open Register Objects.
- The Audit Trails log shows a
CREATEand anUPDATEfor a pet you edited. - A schema's Security tab scopes read/write to a group.
- Exporting the register produces a configuration JSON you could import elsewhere.
Where to go from here
You have a register full of well-modelled, searchable, versioned, permissioned data. The next two tutorials take it further down the pipeline.