The French, the Germans and the Dutch are each building their own sovereign workspace. La Suite is beautiful, as ever. openDesk is well engineered and gloriously feature rich. MijnBureau ties the best of both together, because of course it does.
So we borrowed a method from Dr Frankenstein. Take the guillotine to the French design, apply the Dutch instinct for stitching things together, and graft the result onto German engineering.
Introducing La Frankendesk: a best-of-breed open workspace that adds no new portal. No repositories were harmed in the making of it.
Passwords, API keys, tokens, certificates — every team has them, and most teams keep them somewhere they shouldn't. Keepiq puts them in the workspace people already log into, encrypted so that not even the administrator can read them. The full recording is above.
LaunchPad turns the single, fixed Nextcloud dashboard into a set of personal,
drag-and-drop workspaces. Every user gets their own dashboards; every dashboard
is an independent canvas with its own layout, its own widgets, and its own URL.
Admins keep control — roll out templates, restrict widgets per group, and pin a
group-wide default — while users still get the freedom to personalise.
This tutorial walks the whole surface end to end, from a first-run dashboard to
an admin rollout, using nothing but the UI.
Click the LaunchPad icon in the Nextcloud app launcher, or visit
/apps/launchpad/ directly. The very first time you open it, LaunchPad creates a
personal dashboard for you and seeds it with a starter bundle so you never face
an empty grid.
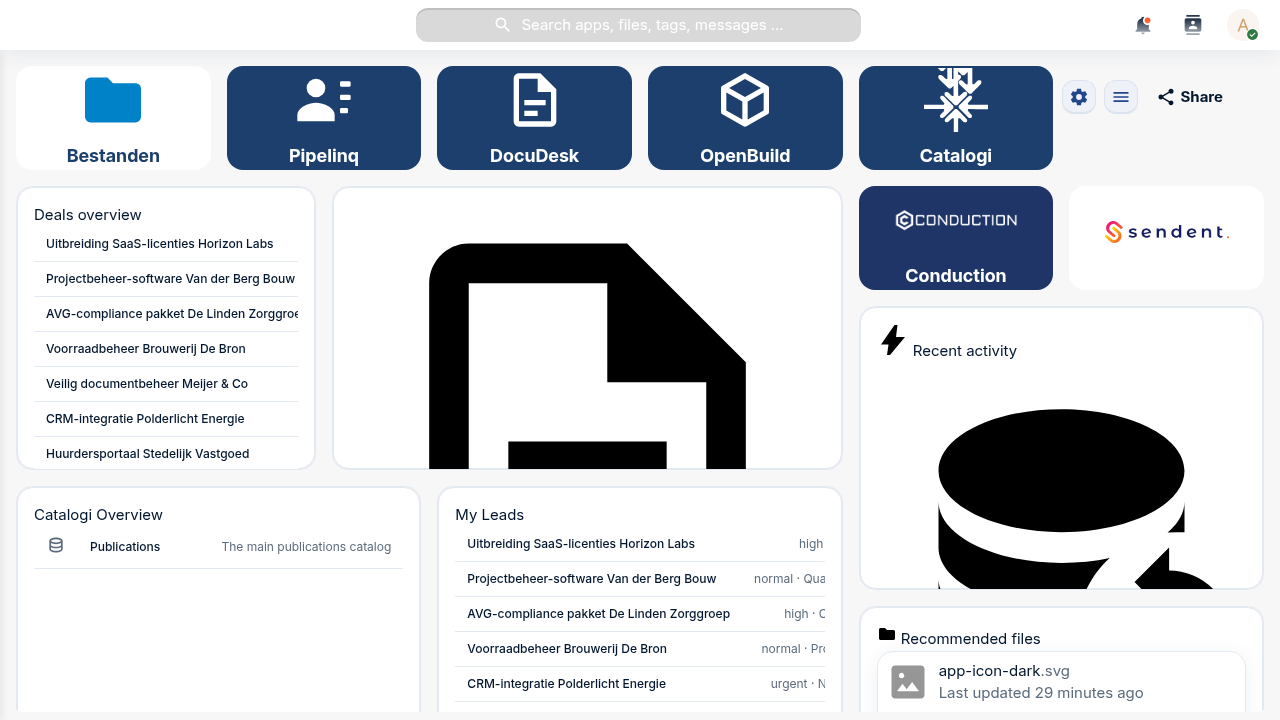
A LaunchPad workspace. The top row is shortcut tiles; below them are widgets, including native Nextcloud dashboard widgets proxied straight onto the grid.
Two things share the grid, and it's worth knowing the difference from the start:
Tiles are shortcut cards — an icon, a colour, a label, and a link to an app or URL. They are LaunchPad's own lightweight launcher.
Widgets are content blocks. LaunchPad renders both its own custom widgets (Label, Text, Image, Link-button, Files, People, News, Calendar, …) and any native Nextcloud dashboard widget (Activity, Recommended files, Calendar, Talk, your other apps' widgets) on the same grid.
Open the active dashboard's cog menu (top-right of the workspace) and click
Edit dashboard. Resize handles appear on every placement, and each tile and
widget grows a small menu button in its corner.
To add a LaunchPad custom widget, open the cog menu again and choose Add
custom widget…. The Add Widget modal opens:
Pick a Widget type (for example Link Button).
Fill in the type-specific fields — a label, a URL, an action type, colours.
Optionally open the Appearance section to set a custom title, a
background, and an icon.
Click Add. The widget lands on the grid and is saved immediately.
For a native Nextcloud widget, the same picker family lets you choose the
Nextcloud widget you want (Activity, Recommended files, a widget from any other
installed app) — it's proxied onto the grid exactly as in Step 1.
Troubleshooting
The widget type list only shows a few options. Custom widget types that haven't shipped a configuration form yet are filtered out of the picker — only types you can actually configure appear. Native Nextcloud widgets come from whatever apps are installed and expose a dashboard widget.
Still in edit mode, add a tile for a link you use constantly. Open a tile's
menu → Edit tile (or add a new one) and you get:
A Title.
An Icon — a searchable Material Design Icons catalogue (7,000+ icons) on
the Icons tab, plus a Custom tab. When the nldesign app is enabled, the
Custom tab also offers the NL Design government icon set; when it isn't, that
pack is simply hidden rather than showing broken images.
Background and Text colours.
A URL — an app path like /apps/files or any external link.
Tiles are the fast way to turn a dashboard into a launcher for your team's most
-used tools.
The grid is a responsive 12-column layout. In edit mode:
Drag a widget by its header to move it; neighbours reflow around the drop
point and the layout saves as soon as you release.
Resize from the corner/edge handles.
Edit any placement's content and appearance from its Edit widget
entry (content fields and the Appearance section — show-title, custom title,
background, icon — live in one modal).
Delete widget removes a placement immediately (there's no undo, so toggle
Show title off instead if you only want to de-emphasise it).
When you open /apps/launchpad/ cold, LaunchPad has to pick a dashboard to land
you on. Your personal pin always wins. Open the cog menu on the dashboard you
want and click Set as default — a ★ marker appears next to it in the
sidebar, and that's where LaunchPad opens from now on.
Use the Share button (or the cog menu's Share) to open the sharing
surface. Today it shares a dashboard with specific users and groups, each
with a permission level — View only, Add only, or Full customization.
Troubleshooting
Where's the public link? LaunchPad has a public-share API (a tokenised, brute-force-protected read-only link at /apps/launchpad/s/{token}), but the point-and-click control to create one from the UI is still on the roadmap. For now the Share button covers logged-in user/group sharing; public links are minted via the API.
Step 8 — Switch hats: roll out a template (admin)
Everything so far was per-user. Now the admin side. Open Settings →
Administration → LaunchPad.
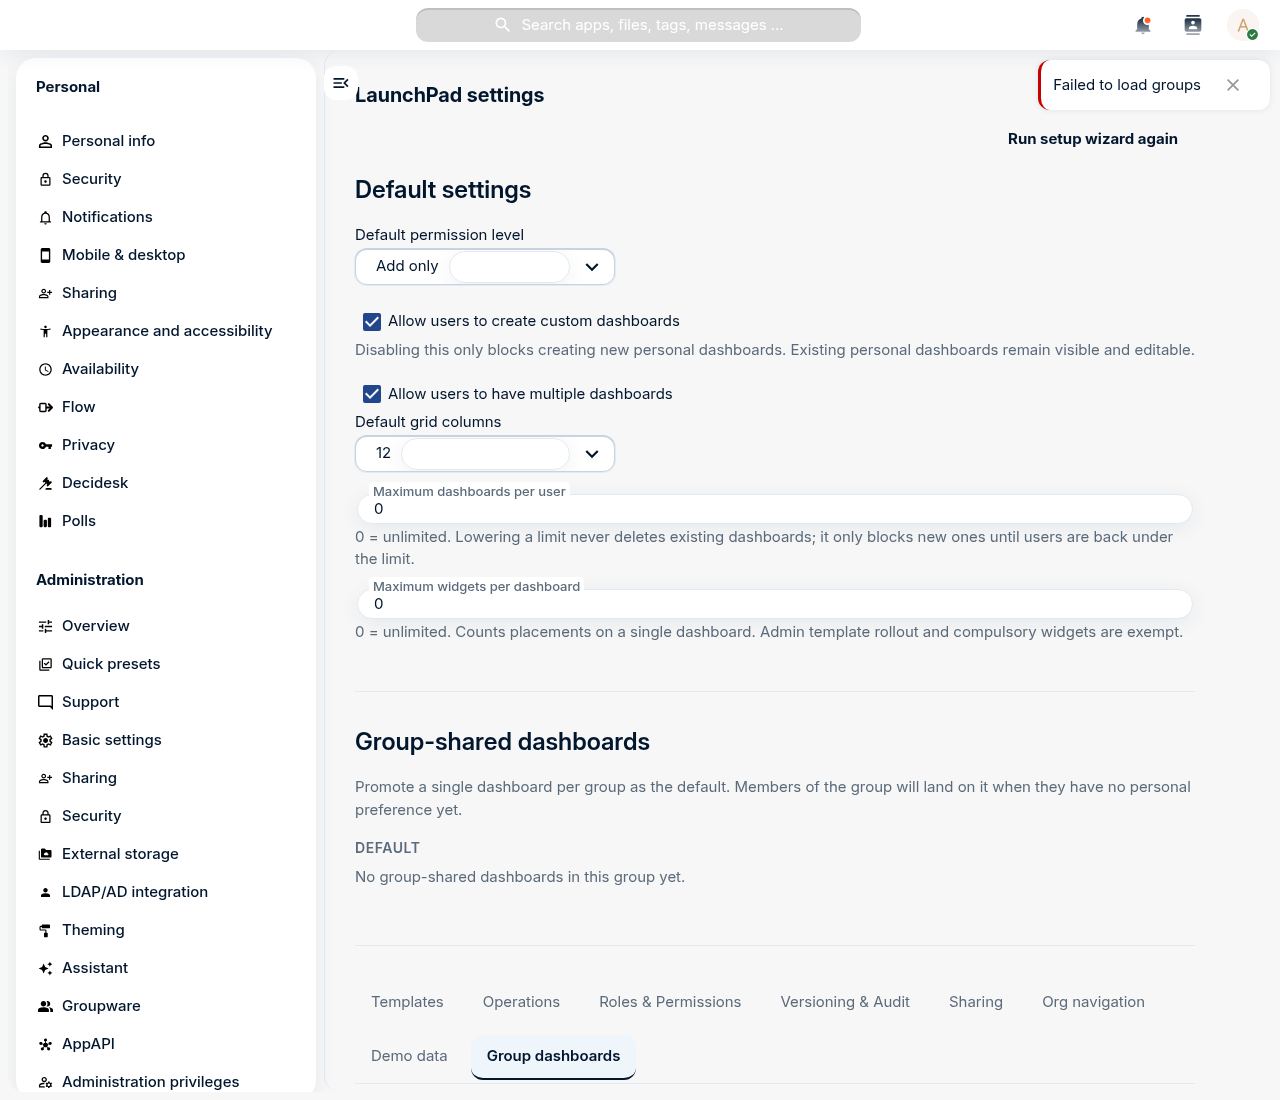
LaunchPad's admin settings: global defaults up top, then a tabbed strip for templates, roles, group dashboards, operations and more.
The top of the page holds the global defaults — whether users may create
personal dashboards, how many they may have, the default permission level, grid
columns, and per-dashboard widget limits.
On the Templates tab, click Create template to author a dashboard
centrally and assign it to one or more Nextcloud groups. The first time a member
of an assigned group opens LaunchPad, they get their own editable copy of the
template — a consistent starting layout without locking anyone in. Mark widgets
as compulsory in the template and users can't remove them.
On the Roles & Permissions tab you define, per Nextcloud group, an
allow-list of widget types. Members of a restricted group see a filtered picker
— handy for keeping niche or sensitive widgets out of specific teams, or for
reducing choice for non-technical users. An empty list means the full catalogue
(the default).
The other tabs round out the admin surface: Group dashboards (one shared
dashboard per group, plus the org-wide default set), Sharing (org-wide share
defaults and forced-share groups), Operations (health + Prometheus metrics),
Versioning & Audit (conditional-visibility rules and privacy-preserving view
analytics), and Org navigation (an organisation-wide navigation tree).
Finally, land every user on LaunchPad after login. This one lives in Nextcloud
core, not LaunchPad's own settings: Settings → Administration → Theming →
Navigation bar settings, enable Use custom default app, and put
LaunchPad first in the priority list. Optionally disable the stock
Dashboard app so the two don't compete. LaunchPad registers under the app id
launchpad, which is the value Nextcloud uses everywhere it refers to the app.
Troubleshooting
The menu tile opens the wrong app. LaunchPad is registered under the folder-derived id launchpad. If a custom navigation entry points at an old mydash.* route it won't resolve — use launchpad.page.index.
You took the fixed Nextcloud dashboard and turned it into a personalised,
multi-dashboard workspace: native and custom widgets side by side, shortcut
tiles, a second context, a pinned default, and shared access — then, as an
admin, rolled a template out to a group, fenced off widgets per group, and made
LaunchPad the front door for everyone.
Een workstation zonder Nextcloud is een halve workstation. Bijna elke andere tutorial in de academy gaat ervan uit dat je er een hebt draaien op localhost:8080. Het goede nieuws: er is al een speciale tutorial die dit van begin tot eind behandelt. Deze module is een korte brug die uitlegt waarom je het nu doet, welke Conduction-apps je installeert zodra het draait, en hoe dit deel aansluit op de rest van de serie.
Hetzelfde patroon duikt op elke keer dat een softwarecategorie door zijn platformmoment heen gaat. WordPress in 2011. Salesforce een paar jaar eerder. Atlassian daarna. De iPhone, in de consumentenmarkt, vóór allemaal. Elk van hen begon als product. Elk werd een platform. De bedrijven die de overgang goed managen, bezitten hun categorie twee decennia later. De bedrijven die dat niet deden, zijn voetnoten.
Ik denk dat Nextcloud nu vlak voor die overgang staat, en ik denk dat het veld eromheen het nog niet doorheeft.
Een Nextcloud-app in de App Store zetten is geen knop, maar een keten. Je hebt een certificaat nodig om je code te signen, dat certificaat krijg je via een pull request op een Nextcloud-repo, en pas met dat certificaat mag je je app registreren en releases uploaden. De officiële documentatie beschrijft elke stap, maar verspreid over vier pagina's. Deze tutorial loopt het in één keer door, van licentiekeuze tot een GitHub Action die elke release automatisch publiceert.
Een Nextcloud opzetten kan op drie manieren, en de "beste" hangt af van wie je bent en wat je al draait. Een homelab op een mini-pc vraagt iets anders dan een gemeente met tien bestuurslagen en een ISO-audit. Deze tutorial zet de drie hoofdopties naast elkaar, met voor- en nadelen en een beslismatrix om snel te kiezen. Niets vervangt de officiële Nextcloud admin docs, maar dit is de korte route naar de juiste hoofdstukken.
This is Part 1 of the app-building tutorial series, the hands-on chassis lap. If you haven't read Part 0: Three paths, one curriculum yet, that's the orientation that explains why we build on this stack rather than raw Nextcloud, and how the manifest and @conduction/nextcloud-vue work as two intertwined surfaces. Part 1 picks up after that decision is made.
You'll build PetStore, a Nextcloud app on top of the OpenAPI Pet Store domain (pets, orders, categories, tags) on the full Conduction Nextcloud stack. The end product: add pets to the store, place orders, see order ship-dates in your Nextcloud Calendar, and surface category-specific care guides from xWiki right next to each pet. Every piece reuses what @conduction/nextcloud-vue and OpenRegister already give you for free.
In Part 1 you scaffold the app, rename it, build it, and see the canonical app chassis on screen. No data, no integrations yet. We get the bones right first.
Voor elke andere tutorial in deze academy heb je een werkende Nextcloud nodig. Dit is de snelste route: een paar commando's en je draait de officiële Nextcloud lokaal op je laptop, identiek aan productie. Je hoeft geen programmeur te zijn — als je een app kunt installeren en tekst kunt kopiëren, kom je er doorheen. Daarna installeer je de Conduction-apps via de Nextcloud app store, hetzelfde pad als productie.